OK not really. I recently found myself in need of some fondant. I don’t really like the taste of fondant and I didn’t like the idea of buy a bunch of it for the tiny little project I needed it for. I remembered reading about homemade marshmallow fondant on The Decorated Cookie and went back to check out what was involved. She had included several other links so I checked those out as well. I also googled “marshmallow fondant” and read some of the recipes that popped up.
Then I decided to wing it.
Here is what I did, it is in no way a perfect recipe for this stuff. I am sure I did several things wrong. I just used things I wanted to from some sources and didn’t do things I didn’t like from others. I will share what worked and what didn’t for me. I think this stuff is pretty forgiving so just play around with it until you get what you want.
First, I thought I would grease the bowl I was going to be working in. This stuff sounded sticky and lots of recipes recommended it so it sounded like a good idea.
This is a trick I learned from my mother. I take a sandwich bag and put my hand inside. I then use my fingers to scoop up vegetable shortening, aka Crisco (That’s what I am using here. If I am using this technique to prepare a cake pan I use butter). I like it because you have super control of where the shortening is going.
Then I poured in about 2 cups of marshmallows. One recipe said to make sure you use a good brand. I used the store brand. I honestly don’t know if it made a difference.
I sprinkled 2 tbsp water over the marshmallows and then did something none of the recipes mentioned. I used a wooden spoon to mix the marshmallows and water. I just felt like they needed to be coated. I don’t know why. I will say that after I microwaved them, the ones around the edges that didn’t have water on them didn’t seem as puffy and melted. It could be I was just wanting to think that my little technique worked, but I can definitely say it didn’t hurt anything. So if you want to stir your marshmallows and water, have at it.
Microwave time was something that no one seemed to agree on. One recipe said 30-40 seconds, another said 2 minutes. I did 45 seconds at first. When they didn’t seem melted enough I added about another 25 seconds. So my total was 1 minute 10 seconds. I probably could have done longer, but in the end I don’t think it mattered.
They come out of the microwave looking like this.
As soon as you start to stir them they lose their shape and become like marshmallow soup. I had a few chunks in mine, which made me think I could have used more time in the microwave, but I am stubborn and so I just mashed the pieces of marshmallow until they smoothed out a little. I think it is ok to have a few little pieces because soon you will be using your hands to knead the mixture and everything gets really smooth then.
IMPORTANT INFORMATION: I forgot to mention, before you start to stir the melted mallows coat your wooded spoon in vegetable shortening. I did this and stuff still stuck to my spoon. Really slather it on there.
I measured out 1 lb (16 oz) powdered sugar.
I had read different amounts but since I wasn’t following a recipe I couldn’t remember which amount corresponded with the amount of marshmallows I was using. So I started adding it a little at a time. A few recipes told you to add this mixture to a stand mixer (bowl and blade coated in vegetable shortening of course), but I am not about to make more dishes for myself. One bowl worked fine for me.
About this point I wished I had gotten my mixer involved. It was getting very hard to mix with the spoon. Then I thought, since you have to get your hands in it later anyways, why not get started now.
I slicked up my hands with shortening (noticing a theme here?)
And kept adding powdered sugar until the dough wasn’t sticky anymore. I ended up using about 9 ounces. I think my dough was a little too dry, but since I don’t have much experience I wasn’t sure. 8 ounces might have worked better.
OH YEAH! I almost forgot! Quite a few recipes called for greasing up your counter top or cutting board to knead the dough. I did all of the kneading inside the bowl. I am all for having to clean the fewest surfaces possible. It worked perfectly fine and made this a one bowl/one spoon project. Perfect!
I did put down some wax paper to add my coloring. The skin tone and grey weren’t too bad, but while mixing the blue my hands were completely dyed!
The next morning I had to make some green and brown and I began to wonder if there was a way to do it without turning your hands into rainbows. I started with my ball of white fondant. I flattened it into a pancake and dropped food coloring in the middle. I folded the edges in and then wrapped the whole thing in plastic wrap and started kneading. The plastic wrap kept the dye off my hands, but was really difficult to work with. It also seemed at times that it was so thin it would bust and spill food coloring everywhere.
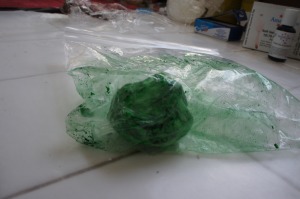
So then I made anther ball of white, flattened it and added color. This time after I folded the edges in I dropped the whole thing into a sandwich bag. Not perfect, but a lot easier to manipulate the dough. Also the extra dye stayed on the sides of the bag not my hands.
When I had mixed most of it in I took it out of the bag to finish evening out the color. What little green came off on my hands washed easily away with a little soap and water.
So I hope that helps. It is not a perfect recipe, but it worked for me. Again, I used:
- 2 cups mini marshmallows
- 2 tbsp water
- 8-9 ounces powdered sugar
- lots of shortening for coating things
- food coloring
- sandwich bags
- and of course 1 bowl and 1 spoon
What did I use the fondant for? You’ll have to wait and see on Tuesday!


