One Hat, Two Hat, Red Hat, Blue Hat

Now I can finally show off what I have been working on for the past few months! (and get back to knitting my pendulum shawl)

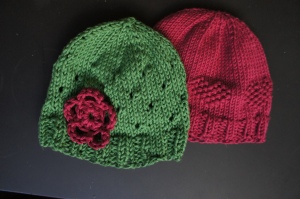
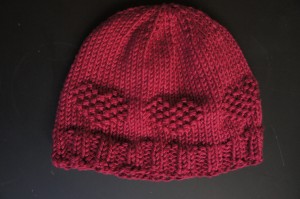
First a hat for a friend at work. The pattern is named Fjord and I knit it with a beautiful red yarn called Rowan Lima that she picked out.

SONY DSC

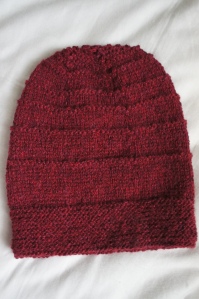
Thanks Hubby for modeling it for me!

SONY DSC

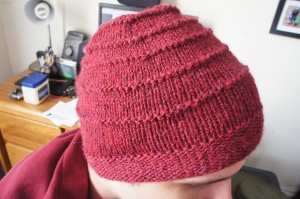
Loved the hat, may have to make one for myself one day.

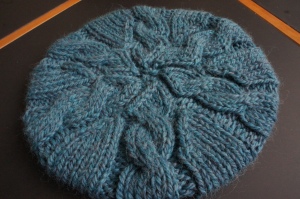
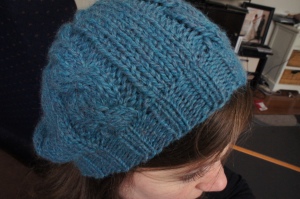
Next a Christmas present for my sister. She asked for a slouchy hat. This is a pretty easy pattern and it knit up really quickly.

SONY DSC

Please excuse the weird self-portrait.

SONY DSC

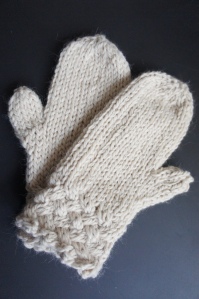
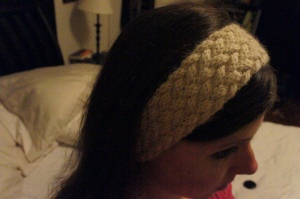
Finally I knit an earwarmer for my mother-in-law who walks outside most days. It has been frigid here and so I hope it keeps her warm! I am going to apologize in advance for these truly terrible pictures. I finished this project right before Christmas and I was working 12 hour shifts all of the days leading up to Christmas day. That meant I had to quickly take pictures in awful lighting after the sun went down.

SONY DSC

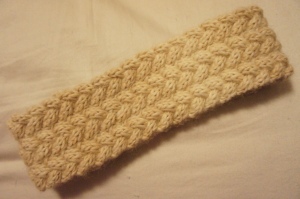
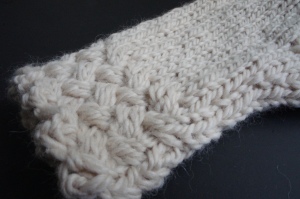
The light does no justice to the color. It is a truly gorgeous undyed alpaca yarn (Cascade Eco Duo) that has a natural variation from light to dark cream color. Although it is a little difficult to work with, the finished products are beautiful and may be the softest things I have ever touched.

SONY DSC

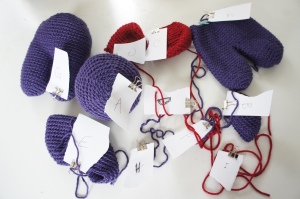
So these things kept me busy for a few months (plus the birthday mittens). I know I said I was going to get back to my pendulum, but I have already bought yarn for two new projects. I don’t know what my problem is, I never had this issue when I was just crocheting! I would finish a project before starting another. Oh well, as long as each one gets finished eventually. . . .

Happy New Year!

Birthday Mittens

Yay! I gave one of the gifts I had made so I can share it now! I had been wanting to make mittens for a while when I found this pretty little pattern.

SONY DSC

I really like the basketweave on the cuff.

SONY DSC

Happy Birthday MGC!

On an unrelated note I had made these two little hats for a teeny tiny newborn. The patterns were written for a premie but I thought the finished product was a little big. I figure the baby can grow into them if nothing else.

SONY DSCI added a crochet flower to the green hat. However, my favorite is the one with the hearts.

SONY DSCEverything else has to wait for Christmas so in the meantime. . . .

SONY DSC

MERRY CHRISTMAS!

Mystery Solved

I have never done a knit or crochet-a-long before. But when one of my favorite designers announced a MYSTERY crochet-a-long I couldn’t resist! Also, I have been so caught up in my new knitting skills I was kind of excited to take on a crochet project. This mystery was called Archer and the link to his Ravelry page can be found here.

So for those who don’t know, in a mystery crochet-a-long (CAL) new clues are released each week and the final clue helps you complete the finished project. In this case we crocheted different strangely shaped pieces for an animal without any idea what they would be when we sewed them together. I wasn’t super organized about getting the pieces done each week, but I made sure to have them all finished by the time the final clue came out.

SONY DSCToday I sewed all the pieces together and met my new puppy friend Archer!

SONY DSCI changed his eyes a little from the pattern because the black eyes didn’t show up against the purple. I made circles of seven half-double-crochets out of white and then added the black safety eyes. I used a smaller sized safety eye because the black part was really just serving as the pupil now instead of the eye itself. Wow, that was a lot of thought I put into those eyes!

SONY DSCI love his little tail, too!

SONY DSCJust for fun I got a picture of him checking out the Christmas tree.

Cutty wasn’t too sure about him and all I could capture was this very blurry picture of Cutty pushing him off the couch.

SONY DSCI know I haven’t been posting a lot but so many of my projects are Christmas presents and I just really can’t show pictures of them until later. It’s funny to look back on the posts last year because I was making dozens and dozens of cookies but this year I am not sure I am going to make any! I have moved on to my new favorite hobby of knitting. Now I have to go listen to my last video lecture of the semester. I can’t believe I am finished with my first sememster of grad school. Apparently I still remember how to be a student! Wish me luck on my final!

Peacock Scarf

I have been dying to share this one with you! However, it was a Christmas gift for a sister who reads the blog and I had to wait. As soon as I saw this stitch I knew what I had to do with it! Although Hubby said it looked like dragon scales (and it is called the crocodile stitch) I thought with the right colors it might look like feathers!I wanted yarn a step up from the acrylic I use for amigurumi but I didn’t want it to be too scratchy and wooly since it was a scarf and would be near her face. I picked this yarn from Michael’s and was pleasantly surprised with how it felt to work with and the results I got with it. It is from Caron’s Naturally Caron line Country. The best part is that the name of the color I picked is Peacock! It was a sign! At the time I was buying it I got two skeins (which was silly because this stitch is kind of a yarn hog) thinking if I needed more they would surely still have the same dye-lot left. Of course when I went back they didn’t. What to do. . .

I decided that part of the peacock’s beauty is in the multiple colors in the feathers so I picked a nice green and spent a lot of time trying to decide how to incorporate it. I decided to place it on the ends to go for symmetry.

Looking at it now I think I was lucky they ran out of that dye-lot! I really like the combination of colors.

I think they look like elegant feathers. Hubby says he still likes to pretend they are dragon scales.

Last of the Christmas Cookies. . .or so I thought

Not a lot of words this time, pretty self-explanatory.

Ornaments.

Christmas lights (kind of love these).

Wreaths. This was another cookie I didn’t think I would like but then ended up being pleasantly surprised with them. Recently I had been struggling with making my icing too runny and for this batch I ended up with icing that was too stiff. You can’t tell in the picture, but it was really frustrating to decorate with.

Not the most cohesive group of cookies, but they are festive and edible and that’s what counts!

So this was my last group from the 8 dozen cookies I had made earlier. However, as we speak there are cookies in the oven. I made some more candy pieces because those seem to be really popular (they are smaller so I think people reach for them first) and some small circles. I had icing left over and just couldn’t let it go to waste.

Hubby said I have a cookie addiction. I told him I’ll take that as a compliment.

Stockings and Candy

As promised here are the stockings and candy from the last post. I didn’t think I would like the stockings. In fact as I sat down to decorate them I was kind of baffled at what to do. However, I think I like them.

I think what made the cookies is the textured “fur” at the top.

People have been super impressed by the pieces of candy which makes me smile because they are super easy. Flood with white icing. Make asterisk (*) shape with colored icing and then swirl colors with toothpick. SUPER EASY!

And here is the group shot again, just because it is one of my favorite sets this season.

I decorate the last of the Christmas Cookies this week!

Cookie Ornament!

This post isn’t about a cookie becoming an ornament, but about an ornament that inspired a cookie!

Each year my mom picks ornaments for us that represent what we have been doing for the past year. This was the year I began decorating cookies!!!! Of course as soon as I saw this ornament I thought what a cute tree and how can I turn it into a real cookie?! Then everyone laughed at me because I have turned into such a big cookie dork.

The tree cutter I have is four parts, not three, so I alternated with each tree whether the dark or light green would be on top. I had read somewhere ( I honestly cannot remember where) that you should start with the darkest color first, let it dry as much as possible, and then add the lighter colors to avoid bleeding. Don’t know if it’s true, but that is how I’ve been doing it.

I wish I could show you lots of “in-progress” pictures, but it became dark outside and my camera is not good struggles with low light situations, so here is the after shot from the next time there was daylight.

In the next group shot you can see a feathering effect on the Christmas Tree in front. This is done with a paintbrush “pulling” the icing and I love it! I had seen it before to make flowers, but when I saw it done on a tree by Ali Bee I knew I had to try it. I will definitely be using this technique again.

Next Post: Stockings and Christmas Candy!

Copycat Cookies

In my last post I shared some cookies by Sugarbelle. I fell in love with them the minute I saw the original post. I thought I would change it up with a nice mint green instead of the pink she used for accents. A few days ago I showed how I used a cookie cutter to make an imprint in the dough for easier icing later. It worked out just like I hoped.

I filled them and then added dots, since I didn’t have any of the nice sprinkles or drages she used.

I wasn’t too sure about them. Some of them looked OK, but some just looked odd. I didn’t know if I had picked the wrong color or if I just wasn’t as talented as Sugarbelle (that is a silly statement because I am obviously nowhere near as talented as her). To check out the color theory I started working on the coordinating cookies.

Here are some of the chevrons (I am going to be honest, I loved what she did and I totally just tried to make the set myself. Someday I will be experienced and confident enough to come up with my own creative ideas. Until then all credit for these cookies goes to Sugarbelle)

I was really good and really waited hours between layers. Usually I am too excited/impatient to wait and end up paying the price with bleeding colors, etc.

Hubby thought the reason I didn’t feel great about some of the cookies was the fact that on a few of them there was too much negative space (i.e., not enough of the tree and too much white).

Here is the completed set:

I will honest and say I wasn’t thrilled. The colors work better when you see all the cookies together, but it is nowhere near as cute as the original pink cookies. Some of it I am sure was poor technique. But either way I didn’t feel like taking many more pictures. Oh well, I guess this means I’ll just have to keep practicing 🙂

The important thing is they taste fine and will be eaten tomorrow when my mom’s family gets together for Christmas.

9 Cups of Flour Later. . .

I started my holiday cookies today. I decided to follow Bakeat350 ‘s advice and bake all my cookies ahead of time. I will decorate them in batches later. I didn’t think to take pictures until most of the damage was done.

I was extremely excited to use my new cookie cutters, a wrapped candy, an ornament, and a Christmas light. I got them here.

I was even more excited to try this technique from Sweetsugarbelle (this link takes you to a blog where she did a guest post). The technique uses a tree cookie cutter to imprint on the dough. When it is baked, the indentation is still there making it super easy to color in with icing!!! Here are the baked cookies.

Sorry for the blurry picture (a new camera is on my Christmas wish list!)

Here are all the cookies ready to be stored until I am able to decorate them. I will leave them out for the next few days and then the ones I am not able to decorate until later I will freeze.

So, 9 cups of flour, 6 sticks of butter, 3 cups of sugar, 3 eggs and some vanilla and almond extract later. . . this is what 8 dozen cookies looks like. I am afraid it won’t be enough!

Kitten Pile

Our two foster kittens go back to the shelter tomorrow. They will have their surgeries and then be ready to be adopted into their forever homes! Whoever gets these two little guys will be super lucky. These two have more than enough personality and curiosity to be really entertaining, but they both also love to cuddle and purr on your lap.

Tonight I walked into the bedroom to find them in a kitten pile. Of course now that it is time to go, they all seem to be getting along perfectly. They never seemed to have too much trouble, but now they are all BFF’s.

I think Cutty will be happy to have his Mommy and Daddy all to himself again, but I think there will be a large part of him that misses his little buddies.

On that note, if anyone out there is going to be giving a kitten or puppy (or dog or cat) as a Christmas present. . . . GO TO YOUR LOCAL SHELTER! They have so many animals who are dying to be part of your forever family 🙂